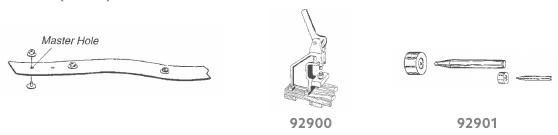
RIPPLEFOLD*TM FABRICATION GUIDE
OVERVIEW & FABRICATION
Why Ripplefold*TM?
A beautiful, tailored look, our Ripplefold TM system gently glides along the track as each fold falls evenly and perfectly into position. Master carriers that work together to eliminate flat drapery areas, giving your drapery panels a full, luxurious look.
Benefits & Features
Advantages
• Folds have a stylish, contemporary look • Low maintenance • Less stackback, more light • Minimum track exposure • Easy fabrication
How it Works
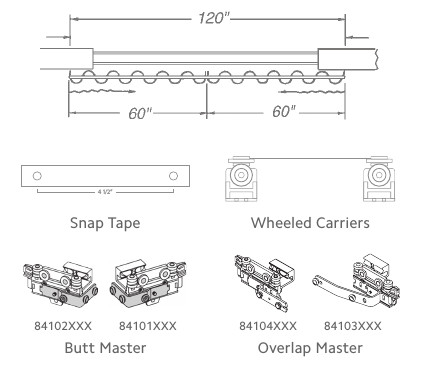
This desired style of track system is mounted on the wall, ceiling or in recess. Tape is stitched to flat, hemmed panels of fabric using this guide for specifications. Once the tape is stitched, the panels snap to carriers creating a graceful, uniform flow of ripple-like folds that stack back to the very ends of the track taking up less space than conventionally pleated draperies. More glass is exposed so you can enjoy more natrual light.
Ease of Fabrication
Unlike pleat stitching, RipplefoldTM only needs straight hemming so extra support from crinoline is unnecessary. The permanently stiffened nylon snap-tape supports headings even through repeated laundering or cleaning. Because not every fabric looks flattering with Ripplefold TM, the drapery fabric should be checked for compatibility with the heading system. If in doubt, a sample should be made up and installed to check appearance. Fabric requirements are easy to configure using our charts in this guide.
Low Maintenance
The speed and ease of snapping panels into place reduces maintenance time and expense. Draperies stay tidier longer because they are handled less. Off the track, RipplefoldTM draperies are perfectly flat making laundering, cleaning and pressing easier and less expensive. Draperies fall into soft, natural folds when panels are snapped into carriers.
How to Determine Specifications
Example
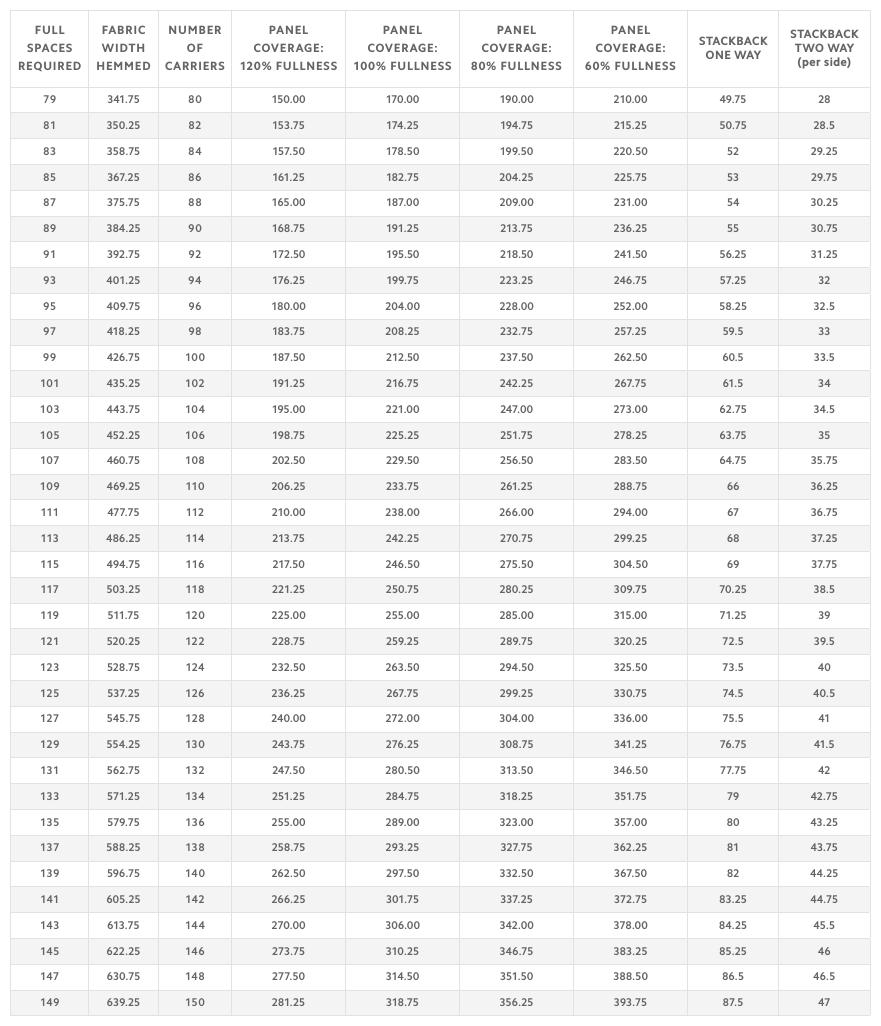
Treatment will cover an area 120" wide. Desired fullness is 80%. Suggest a two-way draw system, with snap carriers and butt masters. Because this will be a two-way draw track system, there will be two panels. The track length is 120", therefore the coverage area of each panel will be 60". Using the butt master chart on page 6, locate the column for 80% fullness. Move down the column to the 60" row. This row contains all required information for this particular treatment:
• Fabric width (hemmed) will be 1061⁄4"
• There will be 26 carriers and 25 spaces on the snap tape
OVERVIEW & FABRICATION
How to Fabricate RipplefoldTM
1. Decide the following conditions
• Width of area treatment will cover (width of track)
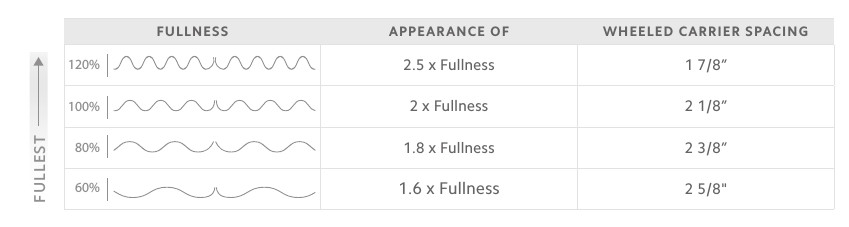
• Desired fullness (60%, 80%, 100% or 120%)
• One-way or two-way draw
• Butt master or overlap master
2. Determine the coverage per panel
For a one-way draw system you will have one panel, therefore the coverage per panel will be equal to the width of your track.
For a two-way draw system you will have two panels, therefore the coverage per panel will be half the width of your track.
3. Select desired fullness using chart
Follow the chart to find your desired fullness, move down the column to the row with your panel coverage measurement. This row gives you the fabric width (hemmed), number of carriers and number of full spaces. Note: Due to slight manufacturing variations, the total length of snap tape may not exactly match the panel width. Begin with snap tape aligned correctly at master end, allow variation at return end.4. Measure and cut snap-tape
Count off the number of snaps on the tape and mark for cut off, allowing extra tape for hems as well as for additional master carrier and return snaps. Follow specific instructions and diagrams for chosen RipplefoldTM style. Note: First factory snap is one of two snaps that will attach to the master carrier. A second master carrier snap must be added. The following measurements for the butt master, overlap master and return allow for 1/2" hem on each end of the tape.
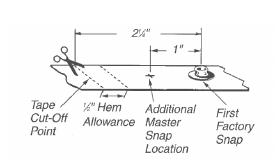
Butt Master
Cut off tape 2 1/4" before the first factory snap. Make a mark 1" before the first factory snap, this is the second master snap will be added.
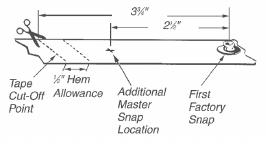
Overlap Master
Cut off tape 3 1/4" before the first factory snap. Make a mark 2 1/2" before the first factory snap, this is the second master snap will be added.
5. Determine return length
Add 1/2" hem allowance to your desired return length. Measure this distance from last factory snap and cut tape here. Use hook to secure return to track.
6. Adding the second master snap
Pierce tape at the position you have marked. Insert eyelet through hole, cover with male snap and rivet together using bench snap tool (92900) or hand tool (92901).
7. Preparing your panels
Cut and hem panels to required width and desired length.
Be sure to allow for track clearance plus desired floor clearance.
A 1" hem is sufficient for heading; stiffened nylon tape provides adequate
support. For additional support for light weight fabrics, buckram or pellon
can be added.
Spacing for double needle heads should be .718" or 23/32".
Place tape on heading of flat panel. Turn each end of tape under 1/2" Using
a zipper foot, sew heading from master end. Stitch as closely as possible to
top of heading to prevent the fabric from coming into contact with track
during operation.
Panels are now ready for attachment to track set. Beginning with master
carrier, simply snap panels into carriers.
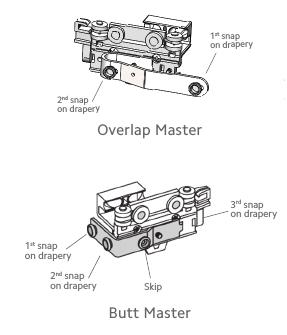
The first snap of the drapery should be snapped onto the first snap of the
Overlap Master, followed by the second snap on the Overlap Master. The
third snap on the drapery should be snapped onto the first carrier on the
track.
The first two snaps of the drapery should be snapped onto the first two
snaps on the Butt Master, skip the snap on the face of the Butt Master then
snap the third snap of the drapery to the snap on the end (white plastic)
and then snap to the first carrier on the track.
Ripplefold-TM for Butt Master
To help determine which system is right for your project, use the guideline below to select the best fit.


RipplefoldTM for Overlap Master
To help determine which system is right for your project, use the guideline below to select the best fit.
 .
.